

A power drill is one of the most useful tools you can own—and one of the easiest to misuse. Whether you’re hanging shelves, assembling furniture, or drilling pilot holes, knowing how to use a power drill properly makes projects faster, cleaner, and safer.
This guide covers how to use a power drill step by step, the parts of a drill, safety basics, and the accessories that make drilling easier and more accurate.
What Is a Power Drill?
A power drill is a handheld electric tool designed to:
- Drill holes into wood, metal, plastic, or masonry
- Drive screws (with the correct settings and bits)
Most modern drills are cordless, powered by rechargeable lithium-ion batteries, and feature adjustable speed and torque.
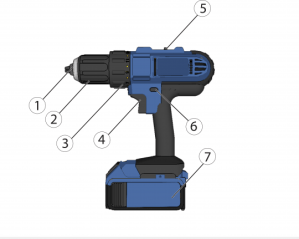
Parts of a Power Drill (You Should Know These)
Understanding the basics makes everything else easier:
- (2) Chuck – Holds the drill or driver bit
- (1) Chuck jaws – Clamp down on the bit
- (4) Trigger – Controls speed (more pressure = faster)
- (6) Direction switch – Forward (drilling/driving) or reverse (removal)
- (3) Torque clutch – Prevents overdriving screws
- (5) Gear selector – Low speed/high torque or high speed/low torque
- (7) Battery pack – Powers cordless drills
Knowing where these controls are lets you stop fighting the tool—and start using it.
Of course, drill styles vary, and the controls may not be exactly as pictured above. Take a moment and find these parts on your drill.
Drill vs Driver: When a Power Drill Is the Right Tool
A power drill is ideal for:
- Drilling pilot holes
- Light to medium screw driving
- Woodworking projects
- Furniture assembly
- Household repairs
For long screws or dense materials, an impact driver may be better—but a drill is still the most versatile starting point.
Check Power Drivers vs Impact Drivers to see the primary differences between them.
How to Use a Power Drill (Step by Step)
1. Choose the Right Bit
- Drill bits → for making holes
- Driver bits → for screws
Match the bit size to the task:
- Pilot hole = slightly smaller than the screw
- Screw driving = exact match to the screw head
2. Insert and Tighten the Bit
- Open the chuck by twisting it counterclockwise. You’ll see the chuck jaws widen enough to fit the bit.
- Insert the bit fully into the chuck jaws. Make sure it’s centered between them.
- Tighten the chuck by turning it clockwise by hand (or you can gently squeeze the trigger while holding onto the chuck.) Make sure the chuck is firm and tight.
A loose bit causes wobble, stripped screws, and frustration.
3. Set the Direction and Speed
- Forward = in most drills, push the button to the left for drilling or driving screws
- Reverse = push it to the right for removing screws
Set the Speed using the Gear Selector. The markings may say H/L or 1/2. L or 1 is generally the lower speed.
- Low speed for driving screws
- High speed for drilling holes
Start slow. You can always go faster.
4. Adjust the Torque Clutch (For Screws)
The numbered collar controls how much force the drill applies.
- Lower numbers = gentler, softer stop for small screws and soft materials
- Higher numbers = more driving power for a firmer connection
If the drill clicks and stops before you want it to, increase torque slightly.
This prevents:
- Stripped screw heads
- Broken screws
- Damaged materials
5. Drill or Drive with Steady Pressure
- Hold the drill straight – some drills actually have a little bubble level in the back to help you.
- Gently squeeze the trigger
- Apply gentle, even pressure
- Let the tool do the work – the weight of the drill will drive the screw or the drill bit. There’s no need to push.
For drilling:
- Back the bit out occasionally to clear debris
For screws:
- Stop as soon as the screw seats flush or when the clutch begins clicking.
- If the drill bounces out of the screw, you’ll feel the drill want to wander and make a clicking noise that is not the clutch. That usually means the screw and the bit don’t match – this happens a lot with Phillips screws. Find a bit that fits more tightly into the screw. If you can’t, slowly drive the screw, pausing when you hear the bit bounce.
Safety Tips for Using a Power Drill
This is where many beginners get hurt—or damage their work.
- Wear eye protection (always)
- Tie back long hair and avoid loose clothing
- Keep fingers away from spinning bits
- Never force a jammed bit. If the bit jams, reverse the direction of the drill and gently back it out.
- Secure your workpiece with clamps when possible
- Remove the battery when changing bits
If something doesn’t seem right, stop. Drills don’t need muscle—just control.
Common Power Drill Mistakes
Avoid these classics:
- Using the wrong bit type – make sure the bit fits firmly into the screw. There are two types of Phillips bits – make sure yours match.
- Driving screws on high speed – set the Gear Selector to the lower setting
- Forgetting to set the torque clutch – setting it near the middle of the range should work for most of your jobs
- Driving screws or drilling without pilot holes – large drill bits usually need a pilot hole, too
- Letting the drill tilt off-axis – make sure you keep the drill straight while using it
Most “bad drills” are just “bad setups.”
Helpful Accessories for Power Drills
These items dramatically improve results and safety:
- Drill and driver bit sets
- Magnetic bit holders
- Depth stop collars
- Countersink bits
- Quick-change chucks
- Safety glasses
- Work gloves
- Clamps
A small accessory upgrade often matters more than buying a stronger drill.
This highly-rated 246-Piece Drill Bit Set contains pretty much all of the accessories and drill bits you’ll use in your DIY career.
(As an Amazon affiliate, I earn on qualifying purchases)
Corded vs Cordless Power Drills
Cordless drills:
- More convenient
- Ideal for home and DIY use
- Limited by battery life
Corded drills:
- Constant power
- Better for heavy-duty or long sessions
- Less portable
Most homeowners are best served by a 12V or 18V cordless drill.
Final Thoughts
A power drill is often the first real tool people buy—and the one they use forever. Learning to use it correctly saves time, protects your materials, and prevents injuries.
With the right setup and a little patience, a drill becomes less intimidating and more empowering—exactly what good tools should be.
Related Posts
- The DIYer’s Toolbox
- Power Drivers vs Impact Drivers
- How to Choose the Right Screwdriver
- How to DIY It Safely
DIY projects involve risk. Always follow manufacturer instructions and use appropriate safety precautions.
7002
©2026 SkippityWhistles.com All rights reserved
