
(or: How to Answer the Drip-Drip Call Instead of Calling the Plumber)
A leaky faucet isn’t just annoying — it can waste hundreds of gallons of water a year. Most drips are easy to fix with a few simple tools, a replacement washer or O-ring, and a little patience. This guide will help you stop the drip safely, save your water bill, and maybe avoid that call to the plumber.
Signs Your Faucet Needs Repair
- Constant dripping from the spout
- Pooling water around the base
- Leaks when handle is off
- Handles stiff or wobbly
Tools & Supplies Needed
- Adjustable wrench
- Screwdrivers (Phillips & flat-head)
- Replacement washers/O-rings/cartridge
- Teflon tape
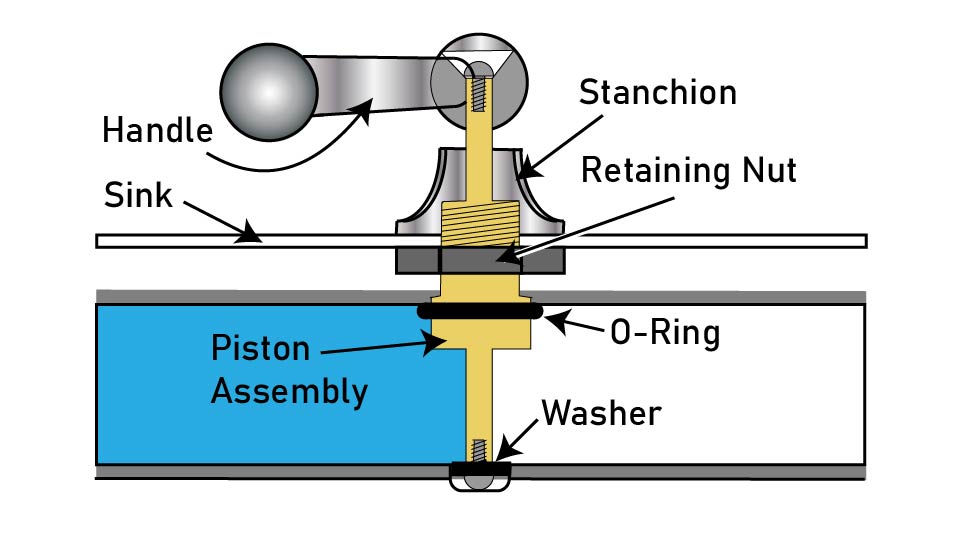
How a Faucet Actually Works
“All you have to do is replace the O-ring.“
What does that even mean? Sometimes it feels like we skipped a very important step labeled: Insert Plumbing Wizardry Here.
Let’s un-wizard it.
A standard sink faucet does one simple job: it stops water when you tell it to stop and lets water through when you tell it to go.
Inside that shiny handle is not magic. It’s a traffic cop.
Your faucet sits at the end of a supply pipe. There’s always water in that pipe – it comes right from the water main out in the street. At the bottom of the supply pipe is a little pad, called a valve seat.
When you turn the faucet handle in the “off” direction, you’re driving a supply-pipe-sized piston into the supply line. At the bottom of this piston is almost always a rubber washer.
If it’s a newer faucet, it may have a self-contained control unit called a cartridge.
Whichever it is, it eventually comes to rest against that valve seat. That’s when the water flow shuts off completely. You can’t turn the handle any further because the inside of the faucet valve is at the bottom of the supply pipe.
When the washer gets worn out or cracked or mis-shaped, it allows a tiny drip, drip, drip that eventually works its way up the piston and out of the faucet.
When you turn the handle counterclockwise to use the faucet, the rubber washer lifts off the pad and allows water to flow up the piston and into the sink. There’s usually a rubber O-ring on the side of the piston about halfway up – that’s to make sure extra water from the supply pipe doesn’t gush around the piston.
When the O-ring gets cracked and tired, water pushes through the crack and squishes out around the piston, under the faucet. That’s why the top of the sink always seems wet.
A cartridge in a neat little plastic-and-rubber unit with all of the moving components inside. Its closed-loop nature makes it almost impossible to see what’s gone wrong with it. Best to just replace it.
The Three Usual Suspects
Washer (older compression faucets):
A little rubber disc that gets squished down to block water. Over time it hardens or frays. It’s basically the brake pad of your faucet.
O-ring:
A small rubber ring that seals around moving parts. When it dries out or splits, water escapes around the stem instead of through the spout.
Cartridge (modern faucets):
A neat little plastic-and-rubber assembly that controls both flow and temperature.
That’s it. No miracle. No plumbing sorcery. Just a tired little part that needs replacing.
And once you know that?
You’re not staring at a mystery anymore.
You’re just replacing an O-ring.
Step-by-Step Repair
- Turn off water supply at the shut-off valves. Those are down where the pipes enter the wall. If the sink is in a vanity, they’ll be inside. If it’s the kitchen sink, they’re low in the back, behind all the drain stuff. Turn the valves clockwise – righty-tighty in this case closes the valve, which is what we want.
- Open the leaky faucet to relieve remaining water. It should run for no more than a couple of seconds. If it’s still running, turn the valve the other direction until it shuts off.
- Remove the faucet handle. This is easy to say, but sometimes hard to do.
- Some handles have a little plastic cap pushed into the top. Gently pry that off to get to the screw head inside.
- Some handles will have a little set-screw on one side. You’ll usually need a tiny hex wrench or a Phillips screwdriver to back out the screw. Once it’s out, you can lift the handle off of the faucet.
- In either case, the handle should lift straight off. It may be stuck down by calcium deposits. Wiggle it to break the calcium loose – sometimes a tap on the side with the handle of a screwdriver might knock it loose (although this is technically misusing a tool, you don’t want to strike the handle with a hammer).
- Remove the faucet stanchion. This is a fancy word for the chrome or brass trim piece that holds up the handle and hides the faucet piston assembly.
- the faucet piston assembly. It is threaded through a nut on the sink itself. This can be difficult to remove if your house has hard water and it hasn’t been replaced for a while. Take your time. Use a second wrench to hold onto the nut while you turn the piston assembly with your adjustable wrench.
- Identify the faulty part (washer, O-ring, or cartridge). You’ll see it.
- The washer will be dish-shaped instead of flat. It may also be cracked.
- The O-ring will be cracked or broken.
- A defective cartridge can be a lot more difficult to detect. BUT, if the washer and O-ring look good, you can pretty much guarantee the cartridge is at fault.
- Replace with the exact replacement. Ah, here’s the rub, isn’t it? How do I know what is and what isn’t an appropriate replacement? There are two roads here:
- If it’s a cartridge, take it with you to your local home improvement center. March it straight to the plumbing section, and to the toilet repair aisle. Match it up to exactly the same thing. If you can’t find an exact match, you can definitely find one online.
- If it’s not a cartridge, take the piston assembly to your local home improvement center. March it straight to the plumbing section, and to the toilet repair aisle. There, using the time-honored “that looks just like it” method, pick out the replacement parts. If you find a generic faucet repair kit with washers and O-rings, that might be your best bet.
- OR, take a look at this best-selling Faucet Repair Assortment Set from Amazon. (As an Amazon affiliate, I earn from qualifying purchases). This will have everything you need to update your piston assembly.
- Pro Tip: Replace both components. Don’t use an old O-ring or washer. Just replace ’em both.
- Re-assemble the faucet.
- Roll the O-Ring up to the groove in the piston shaft.
- Put the screw through the new washer and into the bottom of the piston.
- If it’s a cartridge, install the replacement.
- Put a strip of Teflon tape around the threads at the top of the faucet assembly.
- Tighten the faucet assembly through the nut on the sink.
- Replace the stanchion and the handle.
- Turn on the water and watch your simple DIY handiwork pay off!
Safety Tip: Always check for leaks slowly after reassembly; overtightening can crack fittings.
Final Thoughts – When to Call a Plumber
DIY plumbing is rewarding, but let’s be honest: sometimes it’s messy, awkward, and physically demanding. There’s a reason professionals train for years.
Here’s the reality check:
- Average plumber hourly rate (U.S.): $75 – $150
- Emergency or after-hours work: $150 – $300+ per hour
- Service/trip fees: $50–$250, often credited toward the job
So when you’re staring at a stubborn leak, a jammed cartridge, or a sink that refuses to drain, ask yourself:
“Do I want to spend the next two hours wrestling this, or spend $150–$300 to have someone do it in 20 minutes?”
The takeaway: Sometimes paying for expertise isn’t a loss — it’s an investment in your sanity, your floors, and your spare time.
DIY saves money, but plumbing mistakes can cost far more than a plumber’s bill.
DIY projects involve risk. Always follow manufacturer instructions and use appropriate safety precautions.
3015
