
(Or, How I learned to stop punching random holes in my walls)
You want to hang something heavy. A TV. A shelf. A cabinet. A framed photo of your dog dressed as Napoleon.
There’s just one problem:
Drywall is not structural.
If you want something to stay on the wall, you need to anchor it into a stud — the vertical framing member hiding behind the drywall.
And that’s where a stud finder earns its keep.
Let’s do this cleanly.
What a Stud Finder Actually Does
A stud finder detects changes in density behind drywall.
Most modern electronic stud finders sense the difference between:
- Hollow drywall cavity
- Solid wood framing (the stud)
When it detects a stud, it lights up, beeps, or both.
Translation: “Drill here.”
Types of Stud Finders
1️⃣ Magnetic Stud Finder
Detects screws or nails in drywall (which attach drywall to studs).
Pros:
- Cheap
- No batteries
- Nearly indestructible
Cons:
- Finds fasteners, not the stud edges
- Can require a little patience
2️⃣ Electronic Stud Finder (Most Common)
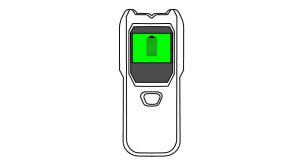
Detects density changes in the wall.
Pros:
- Fast
- Easy to read
- Often shows stud edges
Cons:
- Requires calibration
- Needs batteries
For most DIYers, a mid-range electronic stud finder is the sweet spot. It’s inexpensive, reliable, and far less messy than guessing.
This inexpensive Stud Finder Wall Scanner is highly rated and makes a great start for your toolbox.
(As an Amazon affiliate, I earn on qualifying purchases.)
Magnetic vs. Electronic Stud Finders
Stud Finder Comparison
| Feature | Magnetic Stud Finder | Electronic Stud Finder |
|---|---|---|
| Detects | Drywall screws/nails | Density changes (stud edges) |
| Accuracy | Moderate (finds fasteners, not full stud width) | High (locates stud edges and center) |
| Ease of Use | Very simple | Easy, but requires calibration |
| Batteries Required | No | Yes |
| Works on Plaster | Sometimes better than electronic | Can struggle on thick plaster |
| Price Range | $10–$20 | $20–$60 |
| Best For | Occasional light-duty use | Mounting TVs, shelves, cabinets |
Skippity Recommendation:
If you’re hanging anything heavier than a framed photo, go electronic. The extra precision is worth the extra $20.
Step-by-Step: How to Use a Stud Finder
Step 1: Check the Wall
Stud finders work best on standard drywall.
They can struggle with:
- Plaster walls
- Tile
- Concrete
If you’re working on plaster-and-lath, expect slightly less accuracy.
Step 2: Calibrate It
This is where people go wrong.
Place the stud finder flat against the wall — away from where you think the stud is.
Turn it on.
Let it calibrate.
If you start calibration directly over a stud, the tool gets confused and everything becomes a stud.
Step 3: Slide Slowly
Move the stud finder horizontally across the wall.
Slowly.
When it lights up or beeps, you’ve reached the edge of a stud.
Mark that edge lightly with a pencil.
Keep moving until it stops detecting.
Mark that edge too.
The stud is between those two marks.
Step 4: Identify the Center
Measure halfway between the two edge marks.
That’s your stud center.
Drill there.
Pro Tip: Studs Follow a Pattern
In most modern construction:
- Studs are spaced 16 inches on center
- Sometimes 24 inches on center
Once you find one stud, measure 16 inches left or right to predict the next one.
This makes mounting multiple brackets much easier.
Common Mistakes to Avoid
- ❌ Forgetting to calibrate
- ❌ Moving too fast
- ❌ Not checking for wires
- ❌ Trusting one pass only
Make multiple passes to confirm.
If you’re near electrical outlets or switches, remember: wires often run vertically from them.
Take a look at our post Working with Electricity for more details on your house electrical system.
Safety Note (Because We Like Our Readers Alive)
Before drilling:
- Verify that there are studs a normal distance from where you’re drilling (16, 18, or 24 inches apart)
- Turn off power if you’re near outlets or switches
- Use a voltage tester to check for live wires
- Drill slowly and deliberately
Studs are good. Hidden wires are not.
When You Might Not Need a Stud
For lightweight items:
- Picture frames
- Small mirrors
- Light shelves
A drywall anchor may be enough.
But for:
- TVs
- Heavy shelving
- Cabinets
- Large mirrors
Find the stud.
Always.
Is a Stud Finder Worth It?
If you hang things more than once a year?
Yes.
It costs less than repairing drywall.
It costs far less than replacing a shattered TV.
It costs almost nothing compared to explaining to your spouse why there are fourteen patched holes in the living room wall.
Final Thoughts
A stud finder doesn’t make you a carpenter.
It makes you precise.
And precision is what separates DIY from “Why is there spackle everywhere?”
Use the tool. Mark carefully. Drill confidently.
And let gravity work for you — not against you.
DIY projects involve risk. Always follow manufacturer instructions and use appropriate safety precautions.
2014

Stud finders are one of those tools that seem simple until you are actually using one and getting confusing readings. The tip about common mistakes is really where the value of a guide like this comes in since most people skip the calibration step entirely. One false move when mounting something heavy can lead to a real mess. Well writen and practical breakdown that anyone doing home improvement work will appreciate.
LikeLike