
Knowing how to strip a wire properly is a basic but essential skill for DIY electrical work. Whether you’re replacing a light fixture, installing an outlet, or making a small repair, stripping wire the right way ensures a solid electrical connection and helps prevent future problems.
In this guide, we’ll cover step-by-step instructions, the tools you’ll need, and common mistakes to avoid—so you can strip wires cleanly and safely every time.
What Does It Mean to Strip a Wire?
Stripping a wire means removing a small section of insulation from the end of an electrical wire to expose the bare metal conductor inside. This exposed metal is what allows electricity to flow and makes proper connections possible.
Removing too much insulation—or damaging the wire underneath—can create unsafe conditions, so accuracy matters.
Tools You’ll Need to Strip a Wire
At minimum, you’ll need:
- Wire strippers (manual or automatic)
- Electrical wire (solid or stranded)
- Voltage tester (for safety)
- Utility knife (only if strippers aren’t available)
A quality pair of wire strippers with gauge markings is one of the most-used tools in any homeowner’s toolbox
Safety First: Turn Off the Power
Before working on any electrical wire:
- Turn off the circuit breaker
- Test the wire with a non-contact voltage tester
- Never rely on assumptions—always confirm power is off
This step protects you from serious injury and should never be skipped.
Step-by-Step: How to Strip a Wire
1. Identify the Wire Gauge
Most residential wiring is 14-gauge or 12-gauge. Look for the gauge printed on the wire jacket or match it to the gauge markings on your wire stripper.
Using the wrong gauge notch can nick or weaken the wire.
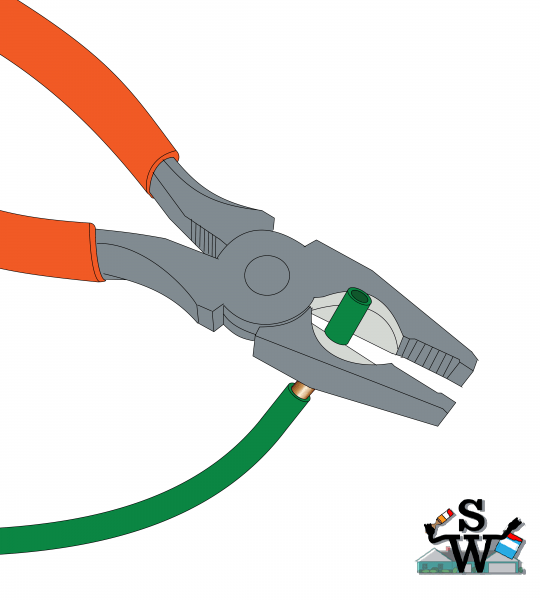
2. Insert the Wire into the Correct Slot
Place the wire into the correct-sized notch on the wire stripper, positioning it about ½ to ¾ inch from the end—enough for most electrical connections.
The wire will not fit! The gauge refers to the copper wire inside the insulation. A 12-gauge wire will not easily fit into the 12-gauge slot on the stripper because of the insulation. Not to worry: the stripper will cut right through it, ensuring a clean strip-job.
3. Squeeze and Pull
Squeeze the handles firmly and pull the stripper toward the end of the wire. The insulation should slide off cleanly, leaving smooth, undamaged copper.
If the wire looks gouged or thin, cut it off and try again.
4. Inspect the Exposed Wire
A properly stripped wire should:
- Have no cuts or nicks
- Show bright, clean copper
- Have no loose strands (for stranded wire)
If anything looks off, redo the strip.
Stripping Solid vs. Stranded Wire
- Solid wire has one solid copper core and is common in household wiring.
- Stranded wire is made of many thin strands and is often found in cords and fixtures.
When stripping stranded wire:
- Use gentle pressure
- Twist the strands together afterward to keep them neat
- Avoid cutting individual strands, which weakens the wire
How Much Insulation Should You Remove?
For most household electrical connections:
- Strip ½ inch for outlets and switches
- Strip ¾ inch for wire nuts
Too much exposed wire can leave bare copper outside the connector, which is unsafe.
Common Wire Stripping Mistakes to Avoid
- ❌ Using a knife instead of wire strippers
- ❌ Stripping too much insulation
- ❌ Nicking or scoring the wire
- ❌ Using dull or damaged tools
- ❌ Guessing the wire gauge
Good wire stripping is about precision, not speed.
Choosing the Right Wire Strippers
Not all wire strippers are the same. Look for features like:
- Clearly marked gauge sizes
- Spring-loaded handles
- Built-in cutters
- Ergonomic grips
Automatic or self-adjusting wire strippers are especially helpful for beginners and frequent DIYers.
Final Thoughts
Learning how to strip a wire correctly is a small skill that pays off every time you work on an electrical project. Cleanly stripped wires lead to better connections, safer installations, and more professional results.
With the right tools and a careful approach, wire stripping becomes second nature—and it’s one of the simplest ways to improve the quality of your DIY electrical work.
Related Posts
DIY projects involve risk. Always follow manufacturer instructions and use appropriate safety precautions.
4007
©2026 SkippityWhistles.com All rights reserved
