
The instructions that came with it say you should clean out your burr grinder. All fine and well, but exactly how to do it? Here’s how:
Keeping your burr grinder running at its best isn’t difficult, and doesn’t take very long to do. But you really must do it at least twice a month. Better to do it every weekend.
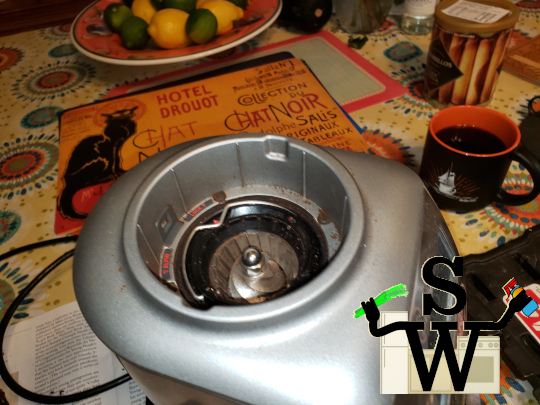
Although the burr grinder referenced here is from Breville, the principles and practices detailed below will apply to almost any grinder.
- Remove the bean hopper and dump its contents into your coffee storage container.
- Spread some newspaper or paper towels on your work table to catch any errant coffee grounds.
- Leave the coffee grinds container in place: it will catch the stuff you’re cleaning up. It’s helpful if you unscrew the lid to the grinds container and set that aside.
- Look at the upper burr – it has a little steel handle you can lift up. Lift the handle and turn the upper burr until the little arrow points to the word “ALIGN,” or a similar mark. It might be difficult to turn because it needs cleaning. Gently rock it back and forth until the arrows align.
- Lift the upper burr out of the grinder. It might be difficult to remove. Gently rock it back and forth until it comes out. Set the upper burr aside for a moment.
- Use the brush that came with the grinder, or use a small, stiff paintbrush to knock the accumulated coffee grounds down and between the teeth of the lower burr inside the grinding bay. Those grounds will fall down into the grinds container.
- If it seems like you can’t get the grounds out of the lower burr grinder, turn the entire grinder upside down over the grinds container and gently shake it, so that the grounds will fall out.
- Use the same brush to clean all of the coffee grounds still clinging to the upper burr assembly.
- Put the upper burr assembly into the grind chamber so that the arrow aligns with the alignment mark.
- Twist the upper burr assembly clockwise until the arrow points locking symbol.
That’s pretty much all there is to cleaning the burr assembly on your but grinder.
However, if it seems like it still isn’t clean enough, you can go one step farther. This requires using a 3/8 hex wrench to remove the lower burr assembly.
Please be aware that removing the lower burr assembly may void your warranty. Only do these steps if you’re confident you can do them, and only if the machine is outside its warranty.
- Remove the upper burr assembly as outlined above.
- Use the 3/8 hex wrench to remove the retaining nut from the lower burr assembly. IMPORTANT!!! Turn the the retaining nut clockwise to remove it. It’s reverse-threaded so that it doesn’t come loose when the grinder is operating.
- Remove the nut, and washer, and the lock washer from the motor shaft.
- IMPORTANT!!! Don’t lose these washers!
- Now lift out the lower burr assembly and clean it the same way you did the upper burr.
- You can use a pair of needle-nosed to lift out the grind drive plate at the bottom of the grind chamber, too.
- IMPORTANT!!! Don’t lose that felt washer from the underside of the grind drive plate. It keeps errant coffee grounds from collecting around the motor shaft and contaminating the motor.
- Now you can clean the errant grounds from the angled chutes of the grind drive plate. You’ll be surprised to see how much coffee has built up there.
- Use the brush to clean the floor of the grinder bay. Brush away any grounds that have accumulated near the motor shaft. If necessary, turn the grinder upside down the shake the loosened grounds into the grinds container.
- To reassemble the grinder, put the felt washer around the motor shaft.
- Put the grind drive plate onto the motor shaft. You’ll find that the flat sides of the shaft match the flat sides of the hole in the middle of the grind drive plate. Push the grind drive plate all the way to the bottom of the shaft.
- Put the lower burr assembly onto the shaft. Put on the smooth washer, the lock washer, and then the nut.
- IMPORTANT!!! Turn the nut counterclockwise to tighten it. Don’t overtighten the nut. Simply turn it until it is firmly in place.
- Replace the upper burr assembly.

To read it, this second cleaning seems complicated, but it truly is not. In total, expect to spend about fifteen minutes cleaning your burr coffee grinder.
So, why do you have to clean it? You’ll get better use, and better coffee, from your coffee grinder if you maintain it. Coffee beans have a naturally occurring oil that builds up and sticks between the teeth of the burr grinders. Coffee grounds collects in the oil, and reduces the burr’s effectiveness. In addition, some beans will break rather than grind, and pieces can get lodged between the burrs, slowing things down.
Please note: do not do this procedure if you are not certain that you can complete it safely, or if it doesn’t seem accurate. Skippity Whistles provides this information as advice, and cannot accept any liability for your usage of it.
10004
©2022 SkippityWhistles.com All rights reserved

Good job 😉
LikeLike
Thank you for the comment and the feedback! Have a great day!
LikeLike